Here is a card I made a while back using paper piecing. The image is called Asian Square Masami / Beautiful from CS Designs. I tried to do a little paper piecing on rhis. I think doing this technique on a digital is much harder than on a regularly stamped image.
A piece of lace punched from a Martha Stewart adds a contrasting color to the card. I really like using green and purple. As a final piece of embellisshment I strung some green beads and attached it to an old button.
Tuesday, August 30, 2011
Monday, August 29, 2011
Under the Sea
Here is a card I created for the 2nd week of CS Designs' "Ocean" challenge. You can find the challenge at the blog Art Without Boundaries.
Using the nymph image I created an underwater scene. The main digital was colored with Copic markers. The designer paper used as a background is water themed. The fish and seaweed are stickers and in the background is a spirelli using one of Chris' spirelli templates.
You still have two days to join in on the fun with the challenge. You do not have to use a digital from CS Designs. You just have to an ocean-themed project.
Sunday, August 28, 2011
Another Week for Portraits
You have one more week to enter my challenge which is being sponsored by Stampsmith Art Rubber Stamps. Below is some more inspiration. So get to your crafting supplies and enter my challenge "Portraits".
I printed the images in a black frame and mounted them on various layers of corrugated and black card and Dovecraft paper. The sentiment is cut from the patterned Dovecraft paper and glued to a corrugated nestabilities cog whereby the edges of the cog are slightly distressed with black ink. The finishing touches are some little doggy buttons, button thread and ribbon knots from my stash.
Vicki
This is one of my first stamps I bought it a number of years ago. The plate was labeled Chix Art Beauties. After stamping, I used three sizes of a Spellbinders die to frame the image. The framed image was placed on a mat of designer paper. The floral arrangement in the corner was made with a couple of Spellbinders to create the scrollwork. I accented the scrolls with some triple-layered flowers. A small acrylic greeting, "dream", sits in another corner.
Petra
A Different Portrait
This time I did something completely different - no stamping at all but I used some of my own photos. My I introduce you to Nele .... she is a rescue dog from Egypt and belongs to my brother. He took her a few years ago and now she is quite an old lady but absolutely lovely and adorable. And this is my tribute to her.I printed the images in a black frame and mounted them on various layers of corrugated and black card and Dovecraft paper. The sentiment is cut from the patterned Dovecraft paper and glued to a corrugated nestabilities cog whereby the edges of the cog are slightly distressed with black ink. The finishing touches are some little doggy buttons, button thread and ribbon knots from my stash.
Friday, August 26, 2011
Getting Some Shopping Done
My card shows CS Designs' Lulu as she does her shopping. I gave her a split green background with a little sequin waste and with a flower on top. The digital and the mat behind it were cut with a Spellbinders die. The mat was made with some printed designer paper giving the card extra color. Lulu herself was colored with Copic markers with a touch of Sticklers to give her and her bags a little glitz. The simple word "shop" was made with some beads.
A New Bookmark
Here is a bookmark that I made for Bella Creations Oh La La bookmark challenge. The main item we had to use is a bathing beauty image from Gecko Galz In the background I used a ink dragging technique. I also used a few nautcal stickers, a punched sea horse and an acrylic sentiment along with a little lace and bow to bring out the theme.
Monday, August 22, 2011
I am Pleased to Announce....
I am pleased to announce that I have been a Guest Designer for CS Design during August and will be returning as a Guest Designer for September. Chris of CS Designs has a brand new blog called Art with No Boundaries. The blog has a nautical / ocean theme challenge running at this time. You will have to drop by and see what the different designerss made for the theme and put in an entry.
Here is a card I made using one of Chris' sentiments not related to the challenge..
 When we traveled out West in our motorhome for 3 to 4 months at a time, we would stop and walk the many trails. I know whenever I saw a sign on the path, I was anxious to see how far we had to go. That time gave me the inspiration for this card. I used spray webbing with embossing powder to give the appearance of woods behind the sign.. The brace for the sign was made with a couple of Spellbinder dies.
Those were good days and I wish I could do it again.
Sunday, August 21, 2011
Digi Darla's Wings and Things
 Here is a little card I made as inspiration for Digi Darla's "Wings and Things" challenge. It is a very quick and simple card. I used her dugital of an angel and colored it with Copic markers. The image is placed on a double diecut mat. The lacey paper trim was made with a border punch. The sentiment was a bought alphabet embellishment. If you have a chance, take a hop to her site and enter her challenge.
Challenge #23 - " Petals"
Everyone loves flowers. I am amazed at God's creation. There are so many types of flowers. They all seem so delicate yet some of them can last the entire summer. Some are bold with wide petals and some have very small and delicate petals. Here is your chance to show off your favorite type. Your flowers may be stamped, cut by hand from paper or cut from a die. They may also be bought embellishments. You may choose to showcase one or many. The choicr is yours.
The tag has been distressed, stamped with a background script stamp, and some flourishes. I have then added some flowers, buttons and a Tim Holtz decoration!
 Petra
Petra
Glitterbabe has graciously offered a $10 gift certificate. Make sure you click on the logo above and visit her store. I am sure you will find something there that is perfect for your next project.
Vicki
My card is made with one of the images from Glitterbabe, my spionsor. I thought it would be interesting to put the flower inside a flower Nestie. The coloring was done with Copic markers. The card uses a technique called Curled Corner. The greeting is a Stampin' Up stamp.
You will notice below that Barbara used the same image as I. Neither of us knew that we were using the same digital. It is interesting to see the different approach two people can use on the same digital.
Valerie
Here is my rose card for the *petals challenge* The rose from LaBlanche - has been stamped with archival black and coloured with water colours , The petals have been sprinkled lightly with some soft glitter. I have stuck to a simple one layer card.Valerie
 Petra
PetraA Lady in Style ... as soon as I had seen the image of the Lady (all images are from The Sum of All Crafts) I knew I wanted to use it for this challenge - together with a wonderful fabric flower (tutorial here). I cut a tag using a flowery digital image whereby the bottom edge is punched with a Stampin'Up edge punch. The basic tag is layered with the Lady image, the fabric flower and a little Eau de Cologne label. Voila!
Barbara
This was a fun card to make. I used a digital image from our sponsor Glitterbabe and the technique Vellum Sentiments from the current Technique Junkies newsletter for this card. I first printed the daisy on white cardstock and colored it with Copics. I cut a piece of vellum the size of the image panel and embossed the frame using an embossing folder. The sentiment was stamped on the vellum. Brads were used to adhere the vellum to the image panel. Everything was adhered to the yellow card base.
I am so pleased to announce that my sponsor for the "Petals" challenge is Glitterbabe Digis. GLITTERBABE DIGIS is a digital stamp store specializing in a variety of images. Steph Hughes leans towards whimsical in her drawings and cover just about everything you need for any occasion. All her images are done in jpg, png and tif format. She strives for quality product and works hard to give her very best. She has tons of fun with it and she hopes you do too.
Glitterbabe has graciously offered a $10 gift certificate. Make sure you click on the logo above and visit her store. I am sure you will find something there that is perfect for your next project.
Tuesday, August 16, 2011
New Blog on the Net
There iw a new blog on the net, It is Art with No Boundaries and it is having it's first challenge.This week's theme is the Ocean, Aquatic, Nautical. Look at all the possibiities you have here...anchors, ships, shells, mermaids. The list is endless so you must join in on the fun.
The challenge rules are very easy and simple. You do not have to use a CS Designs stamp to enter the challenges on this blog, but do drop by and see Chris' art stamps she has for sale. In any case, pick up the logo below and pass the word.
This is my card for the first challenge. It, of course, uses a CS Design stamp. The bright coloring was done with Copic markers. The background reminded me of a quilt pattern so I colored it accordingly. The colors I used were for sand, netting, sun and coral which are all part of the beach.
I could not find the seashells that I have in the garage from the many trips to the beach, so I made my own out of paper and put in a couple of pearls with a pearl pen.
Don't forget to check out the new kid on the block - Art with No Boundaries
Monday, August 15, 2011
More Flower Petals
I have had wonderful response so far to my challenge "Petals". Here is a little more inspiration for you. However, if you haven't entered yet, you still have a week to do so. My design team has made a few more creations to get the juices flowing.
This card has a littlke of a western touch as the back mat is copper cardstock. Also, the single flower with the airbrushing remimds me of the single flowers I have seen in the desert.
I used a photo of my Mum and my eldest sister, taken about 1939 /40. For the background I have used a sheet of 12 x 12" ceramic card - a speciality stamping paper. First I stamped the rose and the owl each twice with resist ink, and let it dry before rubbing over the paper with a mixture of ancient paper, Victorian Velvet and Forest Moss inks. I sprayed it too with some garden fairy green from My tattered angels, before wiping the colour away, leaving just a faint colour and the images showed up white, Then I stamped again, using Victorian velvet for the roses, and Forest moss for the other images. The roses have been embossed with bridal embossing powder, and the owls and clocks with perfect pearls in gold. After they were heat set, I wiped the rest away with an old nylon stocking, it gets rid of the excess powder in no time! You can't see too much of the resist printing, as the light is not ideal, but you can see the white shadows. I used different embellishments - netting, flowers, lace, some prima leaves and some acetate butterflies and a corner. Was relatively quick and easy to make!
Vicki
This card uses a flower image from Glitterbabe. It also features a little airbrushing which I did not only behind the flower, but also on the greeting. As an added touch are little gold fillagree corners and a flower with a butterfly.
This card has a littlke of a western touch as the back mat is copper cardstock. Also, the single flower with the airbrushing remimds me of the single flowers I have seen in the desert.
Michele
I agree with Vicki -- flowers are awe-inspiring. For my "petals"creation I started with a background created using the collaged circles technique from Technique Junkies (I guess I still have circles on the brain from our last Cheerful Stamp Pad challenge!). I used the calla lilies digi-stamp from Glitterbabe Designs which I decorated with colored pencils. I used a few other embellishments -- ribbon, a sweet bird sticker and the word "wonder." As I said. nature is a wonder! I look forward to seeing more of your wonderful creations.
Valerie
Here is a LO I have made, using the same stamped rose as last time (from LaBlanche) and carrying on the theme of petals.
I used a photo of my Mum and my eldest sister, taken about 1939 /40. For the background I have used a sheet of 12 x 12" ceramic card - a speciality stamping paper. First I stamped the rose and the owl each twice with resist ink, and let it dry before rubbing over the paper with a mixture of ancient paper, Victorian Velvet and Forest Moss inks. I sprayed it too with some garden fairy green from My tattered angels, before wiping the colour away, leaving just a faint colour and the images showed up white, Then I stamped again, using Victorian velvet for the roses, and Forest moss for the other images. The roses have been embossed with bridal embossing powder, and the owls and clocks with perfect pearls in gold. After they were heat set, I wiped the rest away with an old nylon stocking, it gets rid of the excess powder in no time! You can't see too much of the resist printing, as the light is not ideal, but you can see the white shadows. I used different embellishments - netting, flowers, lace, some prima leaves and some acetate butterflies and a corner. Was relatively quick and easy to make!
Thursday, August 11, 2011
Finding Inspiration
If you think about stamping and card making all the time like I do, you will find inspiration in very odd places. The other day, I was in a fast food restaurant and I noticed a tent advertisement sitting on the table. I went hone and started working on one. I didn't like a head sitting on top of a pyrmid so I used a dress pattern I had for the body. The "tent" doll will sit on a table just like the advertisement.
The digital (face and sign she is holding) are the two parts of a digital by CS Designs. Go have a peak at the unusual designs there.
Coloring was done with Copic markers and around the doll's waist I used the Glitter Roll technique
Tuesday, August 9, 2011
Bright and Bold
Here is a bright and bold card I made using Spirelli. The main image and sentment are both from CS Designs. Coloring was done with Copics. This is so colorful that it is bound to cheer up the recipient.
Monday, August 8, 2011
Wall Hanging
I haven't previously made very many wall hangings, but I thought I would try one illustrating the sentiment "The Path to a Friend's House is Not Long".
This wall hanging is using the unique digitals from CS Designs On it I put two shrines (or houses) with each containing an image from Chris' Expressive Hearts group. The sentiment is also from CS Designs. Below you will see a full view of the wall hanging as well as close-up shots of different parts.
This wall hanging is using the unique digitals from CS Designs On it I put two shrines (or houses) with each containing an image from Chris' Expressive Hearts group. The sentiment is also from CS Designs. Below you will see a full view of the wall hanging as well as close-up shots of different parts.
Sunday, August 7, 2011
Challenge #22 "Going Around in Circles"
The challenge the next two weeks is "Going Around in Circles" The only requirement is to have a circle on your project. The more the better. Here are some ideas from the Design Team. I hope you have fun with this challenge.
 Petra
Petra
Misty Circles
The sentiment is from Create with TLC. I thought it was amusing and somewhat a bit of truth. I used the sketch from Mojo Monday with its prominent circle for the layout of my card. The background is done using a Tim Holtz texture fade. The image stamp and metal wheel is also from his collection. The Steampunk flavor adds a bit of fun.
Vicki
Very seldom do I make a card without a mat behind the image, but I thought I would do it this time. My card is showing LuLu from CS Designs starting her Christmas shopping. The greeting, which is perfect for the ocassion, is from my sponsor Create with TLC. The small circles under the ribbon have a little spray webbing on them and the little lady is colored with Copic markers. Notice all the jewels she is wearing as she dresses very fashionablely when she shops. The ribbon is a piece I salvaged from a gift I received last Christmas. This makes this usable as an entry in CS Designs' Recycled Christmas challenge.
Michele
Circles are wonderful -- I've noticed that I use them often in my work even without thinking about it. To get started with this challenge I went to the TLC Creations website because they are the challenge sponsor. I found and bought some very fun goodies. The products are made available in a couple of different formats so you have some flexibility in using the digital sheets. This creation is something a little different for me. I used a sheet from "My Garden Set Papers" and several circle images from the "Summer Sherbert Set." In photoshop I dragged the circles into the background paper sheet in a random fashion. I love the background this created. I then printed it and adhered it to some lovely Paper Temptress card stock after cutting with decorative scissors. I liked the background so much I really didn't want to mess with it but in the end I attached a nice K & Company butterfly. I hope you'll join the circles fun! Petra
PetraMisty Circles
Circles - as many as possible, the more the better - this is a wonderful challenge as cicles are so versatile and come in so many disguises. To create the background on my card I used the circle mask from 'that special touch of' and some Cosmis Shimmer chalk mists. I secured the mask with some low-tack tape onto some thick aquarelle card and sprayed it with three different colours. As the card is slightly textured and my spraying needs a bit more practice the finish is not uniform. I mounted the card onto some green card. To finish the card I added some raffia, some paper flowers and a button. Hope you will join us and have some 'circle fun'.
Barbara
The sentiment is from Create with TLC. I thought it was amusing and somewhat a bit of truth. I used the sketch from Mojo Monday with its prominent circle for the layout of my card. The background is done using a Tim Holtz texture fade. The image stamp and metal wheel is also from his collection. The Steampunk flavor adds a bit of fun.
Valerie
I have made a tag to accompany a wedding gift. The background has been distressed with TH inks in stormy skies, Victorian velvet, wild honey and forest moss. I used a flourish stamp and a *Love words* stamp for the background, and added 2 rings, a heart and a white rose. The wedding rings are the symbol for eternity, as they have no beginning and no end.I have a terrific sponsor this time. Create with TLC. The owner is Paulette and she is a Paper Crafting Addict!
She has been crafting digitally for over 15 years. She loves combining the technical aspect of computers with the creativity of the mind and coming up with something fun or inspiring or just plain thought provoking. She gets bored really easily, so she is constantly challenging herself to think of new creative things and ideas and sayings to share with all her followers.
Her Store is ........Create with TLC and her blog is Create with TLC. She loves sharing lots and lots of freebies, so everyone can pass on a little TLC~!. You will find her site quickly by clicking on the logo above
Paulette has generously offered a $15 gift certificate to the winner of the "Going Around in Circles" challenge.
Labels:
Challenge #22,
Copic,
Create with TLC,
CS Designs
Saturday, August 6, 2011
One Day Left for Circles
Hello everyone. You have one day left to join the challenge "Going Around in Circles." If you have not submitted an entry to the challenge yet, I hope you will do so. Create with TLC is offering a great prize, a gift certificate. So pull out your punches or stamps and make some circles.
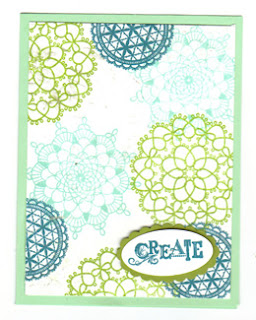
This is a quick card which uses a few circles in a single-layer card. The stamped images are by Stanpin Up.
This is a quick card which uses a few circles in a single-layer card. The stamped images are by Stanpin Up.
Monday, August 1, 2011
On the Dark Side
A couple of weeks ago someone asked if I had ever tried to color on the "dark side" Well, I finally got brave and did it. The image on this tag is from CS Designs. I don't know why I made it purple as my stash of purple paper is very limited. I finally found some paper I thought went with the image and then ended covering most of it up! Such is life. If you have a chance, go over to Chris' CS Designs. You will find some great unique images there.
Subscribe to:
Comments (Atom)


