Monday, September 26, 2011

Additional Transparent Inspirations

Ok ladies, don't be intimated with the title of this challenge.  As you can see below at the DT inspirations that your entry does not have to use a complicated technique to be a part of the challenge "Be Transparent".  You still have a whole week to enter.
Vicki
I wanted to make a window for my sample this time.  However, I didn't want to put it in a card as that is where most people put their windows.  I put mine in a tag.   

I started my tag by using black cardstock and embossing it with an embossing spider web folder.  I then highlighted it with white ink.   Next came the window.

The window was cut with a Spellbinders die and then I covered it with a plastic sheet.  Afterward I placed the image behind the plastic.  The image is little Priscilla from CS Designs.  She was colored with Copics.  Her hair is decked with Fall leaves and she carries  a pumpkin and a spider.. 

I finished off the tag with a ribbon of rafia and a couple of stickers in the spider web.          


Valerie
Hi, Here's Valerie.
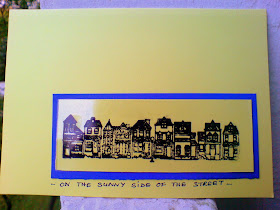
I have printed the row of houses (Hampton Art Stanps) onto a scrap of transparent packaging materal using Stazon black, and made a blue window frame round it, to make it look like the view out of a window.
Petra

You might ask where is the transparency ... I know, it is not easy to spot because of my photographic skills or the lack of! The little bird sits behind a transparent window. For my little wall hanging I reused an old Kraft window envelope and layered it on patterend paper (Echo Park and Prima Marketing). the stamped images are stamps from Stamper Anonymous and Kaisercraft.

Tuesday, September 20, 2011

And the Winner iis...............

For the challenge "Let's Reuse" I asked the members of my team to give me their vote for the top 3 entries.  The one that was voted the most by the team is the box  that  was reused by Cindy Pointe.  I will say that there were many entries that also deserved to win.  However, I am afraid I had only one prize being donated.  I really appreciate everyone sharing her talent at reusing items that would ordinarily hit the trash.  You are definitely a creative group.  Congratulations Cindy.

Sunday, September 18, 2011

Challenge # 25 -"Let's Reuse"

This post will remain at the top during this challenge.  Please scroll down for more current posts.

This challenge is a little different. The Design Team wants you to pick something unusual and recycle it on a project. After the challenge ends, the Design Team will pick the most original recyclable. The winner will not be picked by random generator this time. So look around and see what you can find to recycle.

The Design Team below has given you some great ideas.  Go take a peak and then enter this fun challenge.
Vicki
I took a quick and easy approach to the "Let's Reuse" challenge.  Look a the white strip down the left side.  Can you tell what it is.  It is part of the wristband I had to wear at the hospital  the last time I had a spinal injection.  I cut it to the size I needed, trim the end to match the other end, and put shiny stone brads in every other hole. I used adhesive and attached to the card.   This made a neat embellishment to the card and got rid of the wristband.   Hopefully I won't collect any more wristbands anytime soon.  The sentiment is a CS Designs digital.
Barbara
I love recycle challenges. It's always so much fun to come up with something recycled and to see what others use to recycle. Today I made a wall hanging of a basket of flowers. What did I use to recycle--my favorite Coke Zero cans. All of the flowers and leaves were cut from the cans using a Spellbinders die. They were colored using alcohol inks. Brads were used for the centers and then covered using distress stickles. The board I used can almost claim to be recycled. I bought it decades ago when I was into tole painting. The whitish background was done by painting the section with gesso and stamping it with a basketweave background stamp. I did a light touch over with wild honey distress ink. The basket was die cut from a piece of wood paper. Let's see what recycling you can come up with.
Valerie
Hi everybody. Valerie here. I have made a simple tag from a piece of corrugated cardboard, some paper from an antique book, a piece of string, and a scrap of lace from an old tablecloth. The image is a vintage German scrap. I recycle a lot; first and foremost because I hate to waste things, and secondly it is just such fun to make something pretty from *waste*. Happy creating you all!

Petra
Paperbeads
Almost every day there is advertising material in the post. Normally this goes almost straight away into the recycle bin but sometimes the paper is quite nice because of its colour, texture or even the size. And definitely perfect in re-using it for some paper creations. Here I used an A3 soft furnishing brochure for creating some paper beads (first time ever!). I love the process of making them: cutting the paper in small but long triangles (just with a scissor to keep it simple), rolling the paper very tightly over an old knitting needle in more or less regular/irregular shapes. I love the way each bead turned out so differently. To give the beads some more stability and to smoothen the surface I varnished some of them with glossy accents and some with modge podge. And then .... they are ready to use (lol). I made a little charm with some left-over fabric, some little beads and and an old safety pin. Happy recycling! x

ClearScraps has graciously consented to offer a package of acrylic coasters as the prize for the winner of this challenge.  They carry a wide range of acrylic pieces, such as frames, books, coasters, and miscellaneous shapes.  Click on their name above and visit their site.

Friday, September 16, 2011

Steampunk Tag

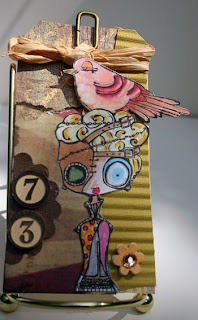
I haven't worked with many tags lately so I thought I would create one today.  This is a little on the steampunk side.  The main image is by Octopode Facotry and the bird is by Stampotique.  This tag was done for the Gingersnap  Creations' Spicy Supply Challenge "Crimpers".  I had to dig deep into one of my stash drawers to find my crimper as it has been ages since I have used it.  The green scrape of paper is what I used my crimper on.  I think is adds a lot to my tag.  Additional embellishments used are a couple of Bingo tokens, a small dimensional flower and an old type hook and some rafia.

Below the picture of the whole tag is a closeup of the main image which I colored with Copic markers.

Wednesday, September 14, 2011

Ocean Waves

I love this sentiment.  It is from CS Designs, a digital stamp company.  The starfish which are part of the digital are colored with Copic Markers.  A small pearl was placed on top of a couple of them to give them dimension.  The waves are an embellishment I found on sale in a discount store.  They are dimensional also and the foam on the waves are highlighted with glitter. The bubbles and shells are also part of the embellishment.
As a final touch I did a little faux stiching on the Spellbinders Nestie

Monday, September 12, 2011

Asian Influenced Card

Here is a card that I recently submitted to CS Designs as Guest Designer for September.  It is another Asian card.  This is a card that was created with a classic style in mind.  The image is Framed Geisha 2 by CS Design.  She is colored with Copic markers.  The image is placed on a background of designer cardstock on which I did a technique call Cuttlebug Highlight using an embossing folder and gold ink.  As an added embellishment, I included a scroll made with a Spellbinder diecut.  Small thin corners of gold foil add a final touch.

I am submitting this in Crafty Boots' "Anything Goes" challenge.

More Recyclables

It is so much fun to get rid of clutter (which I have so much of) by recycling. Here is your chance. If you have usless things laying around, take a double look and see if you can reuse them in a project for this challenge.

Vicki
This time I did a little recycling of something we all find so easy to accumlate -  the local newspaper.  I hope you like my flower on this card as it was made with this week's edition of my local newspaper.  I started to airbrush a little color to it, or add  a little spray glitter.  However I decided against it as I wanted to carry out the grey in the mat and the dark eyes of the image.  My little princess is from Octopode Factory.  The greeting is by Stampin' Up.   Coloring was done with Copic markers.

Glance at the ideas below of the Design Team and look around your home.  I know there is something there you can recycle.  It does not have to be on a card.  You can create an ATC, wall hanging, cover a journal, or any other project you like.  Most of all, tell us what you have recycled.
Michele
This creation came about because I was looking for a particular item I was dying to "recycle" for a project and instead of finding what I was looking for I came across quite a stash of old tickets. I thought the tickets would make a wonderful collage and I'm very happy with the results. The vintage image was a free download from Art Freebies; this lady looks like she would enjoy using some tickets! You've got another week to join this fun challenge. I hope you do!

Petra
For this tag I used three main recycled ingredients: a bottle cap from a fancy bottle of Belgian honey beer, corrugated packaging card and a receipt for a shirt. I kept the receipt because the paper has a nice texture and is so thin that you can see the printed lines on the back of the paper. I gave it a warp pattern with That Special Touch of mask and distress inks. The bees (Percy & Bloom) and the bee hive (Graphics Fairy) are printed onto the stencilled receipt. Afterwards it was simply layering the images on a piece of burlap ribbon and the corrugated card, positioning the bottle cap and stamping a little sentiment.

Wednesday, September 7, 2011

With Sympathy

This is a card I made for a close friend who lost someone in her family this past week.  I hope she likes it and that it shows I care.  If of all I embossed the designer paper which was the background mat.  I highlighted it with cranberry ink.  Next I wrapped the mat with a piece of lace which was punched from white cardstock.
I then stamped my sentiment which is by Stampin' Up and then cut it out with a Spellbinders die.  I cut a second mat using the same die, but a little larger.  Finally I layered flowers on top of each other giving the flower spray dimension.  There are approximately 3 layers for each flower.   Finally a little bow was added to the flower stem.   The second picture was a little difficult to take to show the layers.  I found it hard to click the camera with one hand and hold the card with the other without moving.  It is like patting your head and rubbing your stomach at the same time.

I hope she likes it.

I am also submitting this card to Let's Ink It  Up who is having a Design Call.

Tuesday, September 6, 2011

Asian Card

I went a little of the top with embellishing this card.  The image is called Framed Geisha 2 from CS Designs and she is colored with Copic markers.   Since she is looking to the side, I wanted something to draw her attention.  Thus is the netting made with a net-type ribbon.  It is anchored with two buttons.  The image is matted and put on a background paper of oriental flowers and shapes.

The card is entered into Art Without Boundaries' "Anything Goes", Stammtacular Sunday Challenge's The Sky is the Limit", and Card Making Mama's  "Use a Digital".

Sunday, September 4, 2011

Challenge ##24 -" Portraits"

I hope everyone likes the variety that I have tried to put in my challrngs. This time we are thinking about portraits..These should be "head shots" using your stamps or digis. It should not have the whole figure shown.. And yes, you can have animal portraits also.
Vicki
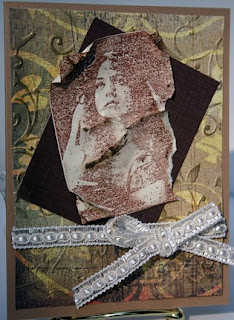
Every time I thnk of portraits I think of old ones that may have been found in someone's attic. This is the thought as I made my card. I took the designer paper and did a little Cuttlebug Highlighting on it in gold ink. It blended in perfectly with the paper, but gave it a little more dimension. The image was distressed and torn a little to give that antique portrait appearance. I finished the card off with a lace ribbon.
Barbara
For my portrait image I chose Marie Antoinette from Stampsmith. Isn't she regal looking? I stamped her on glossy cardstock. (Sometimes the glossy affects the scan with a checked look, but she looks like a photo in real life.) Behind Marie is a vellum doily cut using a Cherry Lynn die. The background is paper which is embossed with glitter flowers. To finish off the card I added a bling fleur de lis made from pearls (Prima)
Michele
For my Portraits and; People Challenge piece I grabbed a favorite Stampsmith stamp -- an image of Diana Ross & the Supremes. Stampsmith images are mostly gorgeous photographic images. They have a lot of movie stars and famous musicians in addition to many beautiful vintage images. So here are the original "dream girls." Colored with markers and enhanced with colored pencils, I cut out my image and placed it on designer paper. I added the hearts (stamp is by Hero Arts), some flowers, lace and shiny, sequin-y stickers. I hope you'll join the fun creating art involving people or animals.
Valerie
For my DT piece I have made an altered canvas, perhaps rather unorthodox for this theme. The canvas was one which had already been used and *stripped* to give it a new lease of life. I made a background of torn paper which I painted with gesso. There was some gold leafing round the canvas before, so I left some it as it was, and painted the rest with gesso, which turned it a nice greeny grey colour. For the main picture I have used a postcard of a self protrait of Stefan Lochner, which is one of the wonderful pictures in Cologne Cathedral, painted in the middle of the 15th century. The pictures of the woman and the hands underneath it are part of some wonderful carvings in Bamberg Cathedral, carved my the great master Veit Stoss at the beginning of the 16th century. I used different embellishments - lace, sack-linen, some torn pieces of a map, some prima leaves, a flower made from antique book sides and coated with Utee, and two Rafel Angels. And of course, one of my little leopards is running through the picture. At the top I have used a silver brooch, which has a small piec of Roman glass in it, bought from the Roman-German Museum shop in Cologne.
Petra
Beauty without Words
This Lady has been tempting me since I had bought the stamp (La Blanche). I stamped her with Memento ink onto Prima Marketing paper without any further colouring and then layered it on patterned paper. The edges of the paper is slightly distressed. The embellishments are mainly from my stash, the charm from Robin and the embellished lace from Lucy. The flower is made of lace, cheese cloth and a fabric bloom.

Stampsmith Art Rubber Stamps

The Stampsmith is known for the super realistic photostamps but also carries a wide variety of images. They do custom stamp work as well. You can see the lineup at www.stampsmith.net (the website will be updated and revamped soon) and you can see the movie star photostamps here: www.stampsmith.net/ssstamps.htm. Email estelle@stampsmith.net with any questions or to order.

Stampsmith is graciously offering the winner, who will be chosrn by random generator, a $10 gift certificate.

Saturday, September 3, 2011

Garden Wall Hanging

Here is a wall hanging that I completed recently and had not gotten around to posting. The background to the wall hanging was created with a number of acrylic paints The faces in the flowers are from CS Designs as well as the bee and sentiment.  The dragonflies are diecuts.  An observant person will notice that the dragonflies were created in reverse of each other.  Below you will see close-up shots of the wall hanging.

I have entered this in Simon's Says Stamp and Show's "Anything Goes" challenge.  Also, I am entering "Use a Digital" in Card Making Mamas. and Creative Inspiration's "Anything Goes, Set 3"